


Which Controller Fits Your Conversion Kit: Amperage Guide
The controller is the electronic component that turns your commands into motion — it regulates the current to the motor and determines how powerful and how smooth the assist is. This guide explains amperage, voltage matching, how to choose the right one, and which controllers match which kits.
Contents
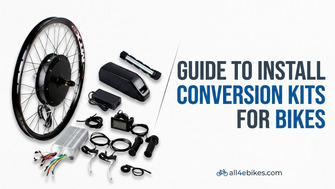
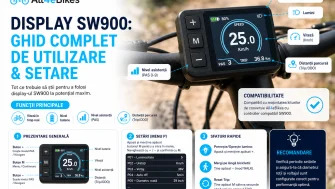
This guide is one part of our complete e-bike conversion kit installation guide — if you haven't fitted your kit yet, start there for the full step-by-step process. Once the controller is wired in, our SW900 display guide covers configuring the display that pairs with it.
What the eBike controller does
The controller is the electronic component positioned between battery, motor and display. It receives:
- From the display: the chosen PAS level and settings commands
- From the PAS sensor: the pedalling signal (cadence and direction)
- From the battery: available voltage and current
Based on these inputs, the controller modulates the current sent to the motor. It enforces the speed limit (software), protects the battery from over-discharge, and stops the motor when you apply the brakes (via the sensor brake lever signal).
What amperage means
The controller’s amperage (A) indicates the maximum continuous current it can supply to the motor. Together with battery voltage, it determines the maximum available power:
A higher-amperage controller can supply more power, but it must match the motor. Connecting a 35A controller to a 250W motor will overheat and destroy the motor.
Controller voltage matching explained
Amperage isn't the only spec that has to line up — voltage matters just as much, and mismatching it is a more common mistake than mismatching amperage. All4eBikes controllers each have a voltage band printed on their label, from 36V up to 72V. A controller rated for one band will not run safely, or in some cases will not run at all, on a battery outside that range.
- 36V-capable controllers (17A: 36V–52V; 22A and 26A: 36V–60V) accept 36V, 48V and 52V battery packs — the standard voltages for 250W–1000W kits. The 35A (48V–60V) starts at 48V and does not run on a 36V pack.
- 48V–72V controllers (45A, 60A) are designed for 48V, 52V and 60V+ packs — used on the higher-power 2000W–3000W kits, where the extra voltage headroom is what allows the higher wattage without pushing current beyond safe limits.
Running a 36V–60V controller on a 72V pack risks destroying the MOSFETs the moment the throttle is applied. Running a 48V–72V controller on a 36V pack will typically undervolt and either refuse to start or deliver noticeably less power than the controller is capable of. If you're buying a controller separately from a kit, always check both numbers against your battery's rated voltage before ordering.
Controllers in the All4eBikes range
Quick reference: kit → controller
| Conversion kit | Included controller | Upgrade available |
|---|---|---|
| 250W MTX Kit | 17A (36V–52V) | — |
| 500W MTX Kit | 22A (36V–60V) | 26A for extra torque |
| 1000W MTX Kit | 25A (48V, included in kit) | — |
| 1500W MTX Kit | 35A (48V–60V) | — |
| 2000W MTX Kit | 45A (48V–72V) | — |
| 3000W MTX Kit | 60A (48V–72V) | — |
How to identify your current controller's specs
If you're troubleshooting or planning an upgrade and don't have the original kit paperwork to hand, the amperage and voltage range are usually printed directly on the controller housing or on a sticker attached to it.
- Check the label first. Most controllers have a printed or stamped label showing voltage range and maximum current, e.g. “48V–60V 22A”.
- Look at the connector type. This won't tell you the exact amperage, but XT60 battery connectors are generally used on higher-current controllers (35A and above), while smaller bullet-style connectors are more common on lower-amperage units.
- Check the motor's rated power, printed on its own label or in your original order confirmation — amperage should correspond roughly to motor power ÷ voltage, per the formula above.
- If the label is missing or unreadable, send us a clear photo of the controller board and connectors; we can usually identify the model from the connector layout and board markings.
Signs your controller may be undersized
An undersized controller doesn't usually fail outright — it just quietly limits what your motor can do. Watch for these symptoms:
- Noticeable power loss on hills that's disproportionate to the gradient — the motor bogs down well before you'd expect it to struggle.
- The controller housing runs warm to hot after a normal ride, even in cool weather. Controllers run at a low, steady warmth under load; genuine heat suggests it's working at or beyond its rated limit.
- Voltage sag under load — if your display shows the battery percentage dropping sharply the moment you apply full throttle or climb a hill, and recovering once you ease off, the controller may be drawing current close to its ceiling.
- Inconsistent assist at higher PAS levels — power that doesn't scale up much between PAS 3 and PAS 5, for example, despite the display registering the level change.
None of these symptoms is conclusive on its own — a low battery or a restrictive current-limit setting on the display (parameter P14, covered in our SW900 display guide) can produce similar effects. But if you've ruled those out and the pattern persists, the controller is a reasonable next thing to check.
Upgrading or replacing your controller: step by step
- Confirm your motor's rated power and battery voltage before ordering — use the quick reference table above, or contact us with your current setup.
- Order the matching controller for your voltage band and motor power. If in doubt between two amperages, size to the motor, not to what you'd like it to be capable of — an oversized controller doesn't make an underpowered motor stronger, it just adds heat.
- Disconnect the battery first, always, before touching any controller wiring.
- Photograph the existing wiring before disconnecting anything, so you have a reference for connector order and orientation.
- Transfer each connector one at a time — motor phase wires, Hall sensor, PAS, brake sensors, throttle, and display — checking each is fully seated before moving to the next.
- Mount the new controller securely, in the same or a similarly protected location, away from direct spray from the wheels.
- Reconnect the battery last and run the same bench test described in our installation guide — wheel off the ground, throttle, brake cut-off, and PAS engagement — before taking it out on the road.
Controller connector types at a glance
Controllers in the All4eBikes range use a consistent connector layout, which makes swapping between amperages within the same voltage band straightforward:
| Connection | Typical connector | Notes |
|---|---|---|
| Motor phase wires (3) | Bullet connectors, or XT60 on 35A+ | Yellow, green, blue — order doesn't affect compatibility, only direction of rotation |
| Hall sensor | 5-pin JST | Keyed — only fits one way |
| Throttle | 3-pin JST | Shared connector type across thumb and twist throttles |
| Brake sensors (x2) | 2-pin JST | Left and right levers, wired in parallel to the controller |
| Display (UART) | 5 or 6-pin waterproof connector | Compatible with both SW900 and UKC1+ |
| Battery | XT60, or Anderson/XT90 on 45A+ | Higher-current controllers use larger connectors to handle the extra draw safely |
Controller placement and heat management
Where the controller is mounted affects both its lifespan and how it performs under sustained load. Most MTX kit controllers are mounted under the saddle in a triangle bag or strapped to the downtube, positions chosen for two reasons: they keep the unit away from direct wheel spray, and they allow some airflow around the aluminium housing, which acts as a passive heatsink for the MOSFETs inside.
- Avoid wrapping the controller tightly in foam or fully sealed pouches that block airflow — this traps heat and can push a correctly sized controller into thermal throttling on long climbs.
- Keep it clear of the chain and rear wheel to avoid both abrasion damage to the housing and road spray hitting the connectors directly.
- Zip-tie the body itself, not just the cables, so vibration over rough roads doesn't work the mounting loose over time.
A controller that's correctly matched to its motor but poorly mounted can still show the same symptoms — hesitant power delivery, heat, occasional cutouts — as one that's genuinely undersized. It's worth ruling out mounting and airflow before assuming the amperage itself is wrong.
When to replace the controller
- Persistent E9 error (controller fault on display) — faulty controller
- Motor starts jerkily or not at all despite full battery and correct connections
- Controller overheats during normal use — MOSFET degradation
- Power upgrade — moving to a more powerful motor requires a matching controller
All controllers in the All4eBikes range are compatible with the SW900 and UKC1+ displays via standard UART protocol — see our complete SW900 setup guide for pairing details.
Tell us your motor power, battery voltage and symptoms — we’ll recommend the right controller within 24 hours.
Controllers available → Technical support →Frequently asked questions
What does an eBike controller do?
The eBike controller is the electronic brain of the conversion. It receives the PAS level command from the display and the pedalling signal from the PAS sensor, and regulates the current sent to the motor. It determines how powerful the assist is, how smoothly it starts, and how well it respects set limits.
Can I use a higher-amperage controller on my current kit?
It depends on the motor. A 250W motor must not be fed by a 35A controller — the motor would overheat. The controller amperage must match the motor power. Contact us with your motor specifications before ordering a different controller.
Controller vs display: what is the difference?
The controller is the electronic unit that actually regulates current to the motor — the power component. The display is the user interface showing data and sending commands to the controller via UART. The controller can work without a display, but you can’t adjust settings or read operational data.
When do I need to replace the controller?
Replace the controller when: E9 errors (controller fault) appear persistently on the display, the motor starts jerkily or not at all despite a full battery, the controller gets excessively hot during normal use, or you want to upgrade to a higher-powered motor.
Is a higher-amperage controller always better?
No. More amperage only helps if the motor is rated to use it — pairing a high-amperage controller with a small motor adds heat and stress without adding usable power. Match the controller to the motor's rated wattage using the table above, not to the highest number available.
Can I mix a 36V–60V controller with a 48V–72V kit?
Not safely, and not without changing other components. The voltage band has to match the battery, and the motor's phase and Hall sensor wiring needs to be compatible with the controller's control logic. Mixing bands is possible in some custom builds, but it isn't something we recommend without direct technical guidance — contact us first with your exact setup.
How long does a controller typically last?
A correctly matched, properly weatherproofed controller typically lasts several years of regular use. The components most likely to fail first are the MOSFETs, usually from sustained overheating rather than age — which is why matching amperage correctly and keeping connectors dry and well-routed makes the biggest difference to lifespan.


Reviews